Saturday, August 29, 2009
Windows 7 Know How---MUST VISIT

Extend Activation period to 120 days
Would you like to extend the activation period to the maximum 120 days instead of the 30 day period that is set by default? It is possible and legal to do this using the software licensing manager in Windows Vista and Windows 7. Simply run slmgr -rearm to get another 30 days at an administrative level command prompt. You can do this a maximum of three times before Microsoft blocks further extensions. Click on the Start Button and type in Command. The Command Prompt Prompt shortcut will now show up in your start panel search results. Right click on the shortcut and select Run as Administrator. After Command Prompt loads, type in slmgr.vbs -rearm and hit Enter. Reboot. ============================================================
Fine Tune ClearType Font Smoothing Everyone has a different idea of good font smoothing. What is nice and smooth to you may be blurry to someone else. That is why Microsoft included the ClearType Text Tuner in Windows 7. Start the ClearType Text Tuner by clicking on the Start Button and typing in cttune and then hit Enter.


Customize Windows7 Your Own Way
Automatic Location Based Default Printer Switching
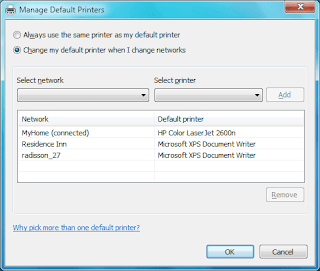
One of the most useful features of Windows 7 for business laptop users is automatic default printer switching based on location. In past versions of Windows it was only possible to have one default printer. In Window 7, you can set default printers based on location. For example, when you are at work your default printer is set to the big multi-function network printer but when you go home your default printer is automatically switched to your local ink jet printer. Automatic default printer switching monitors your computer for network connection changes and uses its database of printers to switch your printer. Printers and their corresponding network have to manually configured on the Manage default printers screen:
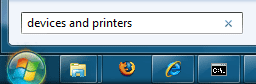
To configure automatic printer click on the Start Menu and type in Devices and Printers and hit Enter
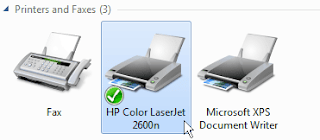
Then, select one of your printers with your mouse.
Click the Manage default printers button on the toolbar.
Make sure Change my default printer when I change networks is selected. Then, select the network from the drop down list and then select the printer you want to use on that connection. When finished hit Add.
When you have finished setting up all of your default printers click OK to save your changes
You will now have an shortcut on the desktop that will launch Flip3D but it has the wrong icon.
One of the most useful features of Windows 7 for business laptop users is automatic default printer switching based on location. In past versions of Windows it was only possible to have one default printer. In Window 7, you can set default printers based on location. For example, when you are at work your default printer is set to the big multi-function network printer but when you go home your default printer is automatically switched to your local ink jet printer. Automatic default printer switching monitors your computer for network connection changes and uses its database of printers to switch your printer. Printers and their corresponding network have to manually configured on the Manage default printers screen:


To configure automatic printer click on the Start Menu and type in Devices and Printers and hit Enter
Then, select one of your printers with your mouse.
Click the Manage default printers button on the toolbar.
Make sure Change my default printer when I change networks is selected. Then, select the network from the drop down list and then select the printer you want to use on that connection. When finished hit Add.
When you have finished setting up all of your default printers click OK to save your changes
================================================================
Bypass open with lookup web service
When opening up a file in windows that does not already have a registered file association you are prompted if you would like to specify what file to use to open the file or if you would like to use a web service. The web service is a great idea for the average computer user but for advanced users, you likely already know what you want to open the file with.
With the help of a registry change you can disable the web service lookup and bypass that screen entirely. Instead you will be taken directly to the list of applications on your computer you can open the file with.
[HKEY_LOCAL_MACHINE\SOFTWARE\Microsoft\Windows\CurrentVersion\Policies\Explorer]
NoInternetOpenWith
Create a DWORD called NoInternetOpenWith and set it to 1.
The next time you use Open With on a file you will be taken directly to the application list.
==============================================================
Windows 7 includes a new tool to help you calibrate the correct gamma, contrast, brightness and color settings for your specific display.
Just click on the Start Button and type in dccw and hit Enter.
Then follow the on screen directions and adjust the sliders..
Just click on the Start Button and type in dccw and hit Enter.
Then follow the on screen directions and adjust the sliders..
================================================================
Change Windows Product Key After Install
Do you need to change your product key so you can activate Windows Vista or Windows 7 properly? You can use a great command line tool that will help you do this very easily. Just follow these steps:
Click on the Start Button and type in command prompt so that it shows up on your start menu search list. Right click on the Command Prompt shortcut and select Run As Administrator.
At the administrator command prompt, type in "slmgr.vbs -ipk"
To activate windows after changing the key, run "slmgr.vbs -ato"
Do you need to change your product key so you can activate Windows Vista or Windows 7 properly? You can use a great command line tool that will help you do this very easily. Just follow these steps:
Click on the Start Button and type in command prompt so that it shows up on your start menu search list. Right click on the Command Prompt shortcut and select Run As Administrator.
At the administrator command prompt, type in "slmgr.vbs -ipk
To activate windows after changing the key, run "slmgr.vbs -ato"
=======================================================================
Create a Flip3D Taskbar Icon in Windows 7
Flip3D was a fun and cool looking feature in Windows Vista that can be very useful for switching between windows. With the improved Windows 7 taskbar, Flip3D was replaced with improved thumbnails and Aero Peek. Those are both good alternatives but I like the speed of viewing all my open windows at once and switching with just two clicks.
This article will show you how to create a Flip3D icon on the Windows 7 taskbar:
Right click on the Desktop and select New and then Shortcut.
Type in RunDll32 DwmApi #105 in the location box and click Next.
Type in Flip3D as the Name and click Finish.
You will now have an shortcut on the desktop that will launch Flip3D but it has the wrong icon.
Right click on the Flip3D shortcut and select Properties.
On the Shortcut tab click the Change Icon button.
Change the Look for icons in this file text box to C:\windows\explorer.exe and it Enter. The Flip3D icon will now be available. Select it and click OK.
Click OK to close out the shortcut properties window.
Finally, just drag and drop the new shortcut on the Windows 7 taskbar to pin it.
============================================================
Create a System Repair/Recovery Disc
New in Windows 7 is the ability to create a system repair CD that will help you recover your computer from serious errors preventing windows from starting up. The recovery disc is based on Windows PE and includes the standard recovery options that are found on any Windows 7 installation disc.
If you have a Windows 7 installation disc, that doubles as a repair disc so you don’t need another. This article is only useful for users that have Windows 7 pre-installed and did not receive the installation media with their computer.
Creating the disc is very simple. Just click on the start button and type in recdisc.exe and press Enter
Once started, put in a CD-R or CD-RW into your burner and click Start Burning.
============================================================
Subscribe to:
Posts (Atom)